Friday, 14 April 2017

New Quarter scale cottage/tree house

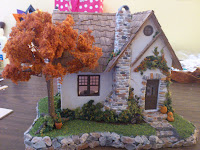
My current quarter scale house build is a little cottage. I was inspired by a picture I had seen on the internet. It was of a little house built into the top of a tree. So I decided to build one with my own spin on it.

I built the walls in the same manner as my other quarter scale cottage (see previous posts). I built the walls using matte board and then added a layer of paper clay to make the plaster siding. The windows and doors were plastic inserts that I purchased. The stones are paper clay as well.

The roof is small strips of wood veneer that I stained. It is such tedious work! As you can see I only have half the roof completed. I also used the thin wood veneer for trim on the windows, doors and architectural details.


Wednesday, 5 April 2017

Ceramic Dice Counters

I decided it's time to continue working on my ceramic dice counters. I like to play Magic the Gathering and whenever I get a new deck I like to coordinate my card sleeves, deck box and dice.

I figured I should try and make some dice counters out of clay. At first if proved quite tricky, when I would go to add the pips or design into the clay it was so soft that it would squish, etc. Soon I realized that if I let it stand in the air for a few minutes prior to shaping my dice, the surface becomes a bit more firm and less sticky, making it easier to stamp.

Currently I'm working on D6 (6 sided dice) that feature a design inspired by MTG mana. So far I have made "Island" and "Swamp" mana designs for the #6 of the dice. It's working pretty good so far. I'd like to eventually get some to sell at the local card stores and on my Etsy site. The plan is to get more colors done as well as make D10 (10 sided dice) infect counters.


It's kinda hard to tell from the picture but these dice have been dyed with blue color. The clay dries lighter in color. Below the drier black dice have a grey appearance. I'm hoping that once I bake the dice in my kiln the colors will be vibrant again. If not I may have to try using a sealant to bring out
the colors. 


A nice close up of the Skull dice. When they are dry I want to color in the pips and skull design white. The blue Island dice will get dark blue pips and water drop design.


Saturday, 1 April 2017

Etsy store is now open!

My Etsy store is now open! You can now check out my miniatures for sale on Etsy.

Etsy store: gkminiatures.etsy.com

The following pictures are a few of the items I have listed in my Etsy store. I have not finished stocking my site, so there will be new listings added over the next few days.

My new picture/camera set up turned out great. I was able to take some relatively nice shots that weren't blurry and showed nice details. The tripod in particular was fantastic and I used a Bluetooth camera shutter button, so every time I took a picture nothing was touching my camera and causing any kind of vibration or movement that could affect my pictures.


Sunday, 26 March 2017

I'm back!

Lately I've been working on making 1:12 scale miniature dishes and filling them with polymer clay foods. I'm also in the process of setting up my Etsy store. Hopefully it will be up and running in the next few weeks. The goal is to try to take some decent photos of my work. Unfortunately with my current set up I often get blurred images when I try to get the close up shots of the minis. I have a new tripod and macro camera lens coming in next week so that should take care of those issues. 

So many tiny dishes!

Chocolate boxes and candy dishes :)

Sunday, 5 May 2013

Home-made cosmetics and body butter

I tried making more cosmetics today. I made a powder concealer, whipped cocoa body butter, and a lip balm. 


The powder concealer took forever to mix the colors! I probably spent an hour mixing in the micas and other minerals! I read online that you can use a magic bullet or coffee grinder to blend the colors. I will try this next time. I think the only thing worse then mixing the colors was clean up. That make-up residue is so stuck on it's crazy. I foresee a lot of hand scrubing in my future... The end product turned out great and matches my skin tone perfectly. I would greatly recomend it and will definitely try it again.


The whipped cocoa body butter smells incredible! It smells like yummy chocolate...mmm. The consistency is really neat. As soon as you scoop some up your body temperature starts to melt it. It is quite oily though. It leaves the skin very moisturized and soft.

The lip balm I made with shea butter. I realized that I'm not a huge fan of the smell of shea butter. It totally overowers the cherry flavor. I may melt it back down and add more cherry flavor; make it a bit more strong.


Friday, 3 May 2013

Finally finished!!! Miniature cottage landscaping and interior


It's Finally Finished!!! I have been very busy creating the landscaping and decorating the interior of my little cottage. To make the base, I took a piece of styrofoam and cut it to size and shaped it.


I placed the house on the styrofoam and traced out where it would sit. I also carved little stairs in the foam and made a porche out of foam core.  The next step is to paint the base. I painted the stairs a tan color, around the house brown (where the flower beds and bushes are going to be) and the grass area green.

Then I applied the grass and dirt. I used model train landscaping. I applied a thin layer of tacky glue to the area that I was covering. Then working over a plate I dropped the landscaping material onto the glue. Wait a few seconds then tap the bottom to remove any excess landscaping.


 I made "stones" using an egg carton. I used the rough side and cut out eneven shapes. Then I simply glued them in place using tacky glue. I made larger stones to go around the base and smaller ones for the steps. I used paper clay to cover the porch. I used the same methode as the chimney.


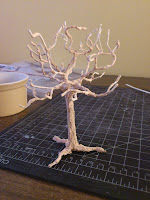
I made the tree by twisting foral wire together. To make the tree textured I painted on a layer of plaster. Once dry I painted it brown. Then, I glued on the landscaping folliage.


Once this was done I glued the house and tree to the base. Then it was time to decorate! The best part! On the outside I made tiny little pumpkins to sit on the steps, a water barel and potted plant. I also created vine to go over the doorway and added moss to the corners on the roof.


For the furniture I modified the plastic quarter scale furniture and made some of my own. Working on such a scale can be frustrating! you have no idea how many times I dropped something on the floor and then spent the next ten minutes trying to locate it!


In the kitchen:
I made a small fridge and stove. I made them using scrap pieces of wood and painted on the details. I modified the pastic sink to go into the counter tops. The kitchen table features a jug, a fruit bowl (I made tiny little bananas, oranges, apples and plums using FIMO), and a loaf of bread that my mom made. On the counter I made a little bowl of cookie dough and cookies. Once again I made them using FIMO.


In the bedroom:
I painted one of the plastic chairs and added a little piece of fabric to it. The fabric is supposed to be either clothes or a blanket drapped on the chair. To make the lamp, I took the lamp that comes in the kitchen packet (of the plastic furniture) and glued the bowl upside down on it to make the lamp shade. I painted little accents and trim in gold. I also made the little plant on the dresser. The pot is made of FIMO and the plant part is landscaping material.


In the living room:
The grand-father clock is the only piece in this room that I did not make. It is part of the plastic furniture kit, I simply painted the face and accented it in gold. The couch and chair I made with wood and leather. The plant is of the same style as the one in the bedroom.


In the bathroom:
I modified the toilet into a modern toilet. I cut the pole off and made a new tank out of FIMO and a new toilet lid from wood. I modified the sink to fit into a vanity that I made with wood scraps. This room still looks a little bare. I have now clue what to put in that one corner. Also the angles of the roof line can make it tricky to fit stuff.


 So there it is... My little 1/4 scale cottage is now complete! I really enjoyed working on this little house. I guess it's time to get started on a new project....


Sunday, 3 March 2013

My New Juicer


Today my husband and I decided that we would start juicing. This is a whole new concept for me and I'm not gonna lie I was a little concerned about how it would taste. Winter and all the holiday get-togethers were not so kind to my waistline. I figured adding juicing to my diet would ensure that I am getting a more complete set of nutrients, vitamines and enzymes.

We decided to purchase the Breville Juice Fountain Plus. On our way home, we stopped at the grocery store and puchased the largest amount of fresh fruits and vegetables ever! We set it up and started juicing things. It works great! It is easy to set up and operate. It has two settings, one for harder fruits (ex. apples) and for softer fruits (ex. strawberries, oranges, etc).

And to top it all off, the blended juices taste great!