Sunday, 5 May 2013

Home-made cosmetics and body butter

I tried making more cosmetics today. I made a powder concealer, whipped cocoa body butter, and a lip balm. 


The powder concealer took forever to mix the colors! I probably spent an hour mixing in the micas and other minerals! I read online that you can use a magic bullet or coffee grinder to blend the colors. I will try this next time. I think the only thing worse then mixing the colors was clean up. That make-up residue is so stuck on it's crazy. I foresee a lot of hand scrubing in my future... The end product turned out great and matches my skin tone perfectly. I would greatly recomend it and will definitely try it again.


The whipped cocoa body butter smells incredible! It smells like yummy chocolate...mmm. The consistency is really neat. As soon as you scoop some up your body temperature starts to melt it. It is quite oily though. It leaves the skin very moisturized and soft.

The lip balm I made with shea butter. I realized that I'm not a huge fan of the smell of shea butter. It totally overowers the cherry flavor. I may melt it back down and add more cherry flavor; make it a bit more strong.


Friday, 3 May 2013

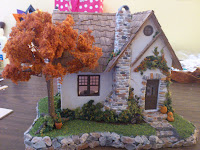
Finally finished!!! Miniature cottage landscaping and interior


It's Finally Finished!!! I have been very busy creating the landscaping and decorating the interior of my little cottage. To make the base, I took a piece of styrofoam and cut it to size and shaped it.


I placed the house on the styrofoam and traced out where it would sit. I also carved little stairs in the foam and made a porche out of foam core.  The next step is to paint the base. I painted the stairs a tan color, around the house brown (where the flower beds and bushes are going to be) and the grass area green.

Then I applied the grass and dirt. I used model train landscaping. I applied a thin layer of tacky glue to the area that I was covering. Then working over a plate I dropped the landscaping material onto the glue. Wait a few seconds then tap the bottom to remove any excess landscaping.


 I made "stones" using an egg carton. I used the rough side and cut out eneven shapes. Then I simply glued them in place using tacky glue. I made larger stones to go around the base and smaller ones for the steps. I used paper clay to cover the porch. I used the same methode as the chimney.


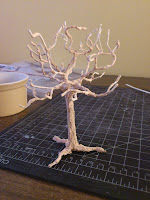
I made the tree by twisting foral wire together. To make the tree textured I painted on a layer of plaster. Once dry I painted it brown. Then, I glued on the landscaping folliage.


Once this was done I glued the house and tree to the base. Then it was time to decorate! The best part! On the outside I made tiny little pumpkins to sit on the steps, a water barel and potted plant. I also created vine to go over the doorway and added moss to the corners on the roof.


For the furniture I modified the plastic quarter scale furniture and made some of my own. Working on such a scale can be frustrating! you have no idea how many times I dropped something on the floor and then spent the next ten minutes trying to locate it!


In the kitchen:
I made a small fridge and stove. I made them using scrap pieces of wood and painted on the details. I modified the pastic sink to go into the counter tops. The kitchen table features a jug, a fruit bowl (I made tiny little bananas, oranges, apples and plums using FIMO), and a loaf of bread that my mom made. On the counter I made a little bowl of cookie dough and cookies. Once again I made them using FIMO.


In the bedroom:
I painted one of the plastic chairs and added a little piece of fabric to it. The fabric is supposed to be either clothes or a blanket drapped on the chair. To make the lamp, I took the lamp that comes in the kitchen packet (of the plastic furniture) and glued the bowl upside down on it to make the lamp shade. I painted little accents and trim in gold. I also made the little plant on the dresser. The pot is made of FIMO and the plant part is landscaping material.


In the living room:
The grand-father clock is the only piece in this room that I did not make. It is part of the plastic furniture kit, I simply painted the face and accented it in gold. The couch and chair I made with wood and leather. The plant is of the same style as the one in the bedroom.


In the bathroom:
I modified the toilet into a modern toilet. I cut the pole off and made a new tank out of FIMO and a new toilet lid from wood. I modified the sink to fit into a vanity that I made with wood scraps. This room still looks a little bare. I have now clue what to put in that one corner. Also the angles of the roof line can make it tricky to fit stuff.


 So there it is... My little 1/4 scale cottage is now complete! I really enjoyed working on this little house. I guess it's time to get started on a new project....


Sunday, 3 March 2013

My New Juicer


Today my husband and I decided that we would start juicing. This is a whole new concept for me and I'm not gonna lie I was a little concerned about how it would taste. Winter and all the holiday get-togethers were not so kind to my waistline. I figured adding juicing to my diet would ensure that I am getting a more complete set of nutrients, vitamines and enzymes.

We decided to purchase the Breville Juice Fountain Plus. On our way home, we stopped at the grocery store and puchased the largest amount of fresh fruits and vegetables ever! We set it up and started juicing things. It works great! It is easy to set up and operate. It has two settings, one for harder fruits (ex. apples) and for softer fruits (ex. strawberries, oranges, etc).

And to top it all off, the blended juices taste great!

Thursday, 21 February 2013

1/4 scale cottage shingles

Today was a very productive day for my little miniature house. I got the shingles onto the roof.

First I added the wall paper to my templates for the ceilings in the attic. I applied glue to the wall paper and attached it to the template. Then I cut it out and dry brushed the corners to add a bit of age. I also cut beams to go in the one room and painted them.


Next, I cut out shingles. I used a cherry veneer wood. Using an X-Acto knife I scored the wood. Then I snaped them in to shingle bits. This was a little time consuming. Eventually what I did is I lined up two or three pieces and then scored them all together.


Once you have your pile of shingles it's time to attach them to the roof. I started by painting the roof a brown color. This way if there are any gaps between the shingles it is less obvious. Then I measured and drew lines 1 cm apart for an idea where to place the shingles. This is quite useful in keeping the rows straighter.


Working from the bottom up, I applied the shingles. I used a "brick" pattern overlapping the rows. I also placed the shingles at different legnths to make it more rustic looking. 


I started at ends and worked my way into the angled sections of the roof. Once I got the the angle, I had to trim the corners to make them fit. I attached the chimney first and shingled around it.


To finish the edges at the top or the roof I cut some shingles in half and overlapped them.  This creates a nice clean roof line.


To add the final touches to the roof I used a wash of brown and black paint. This gave it a very nice rustic, worn look. I tried to put more wash in the corners and at the top of the roof. At the March meeting we will receive our landscaping kit. We will build the base of the house first.


Wednesday, 6 February 2013

and a roof...

Last night I went to the miniature meeting and we asembled the roof sections of the 1/4 scale cottage. Those were not the easiest of things to piece together. I kept the roof sections held together with paper seaming (similar to what was used for the exterior walls). Next step is to make all the shingles that are to be placed on the roof.


Wednesday, 9 January 2013

Painted Bricks!


My husband's in a band and they practice in our house. Needless to say it gets kinda loud on practice nights. Can't watch any TV or the sort, so I figured that I would paint the bricks on my 1/4 scale cottage. The paper clay worked out easier then I had thought. Unfortunately, on the first wall that I papered, the clay was a bit too thick. As a result my wall did warp a tiny bit, other then that it turned out good. I painted the bricks with acrylic paints. I mixed different colors and applied them in a random fashion. Below are my results.


Sunday, 6 January 2013

1/4 inch scale house exterior and fireplace

I made the walls for the attic in the same nature as I did for the walls in the first floor. I cut out a cardboard template, glued my wallpaper onto it and dry brushed a little color in the corners and bottoms of the walls. Then, used YES glue to apply it to the walls.

The chimney stacks on the exterior needed to be thicker at the bottom. So I cut out triangles out of foam core and glued them to each side of the chimney so I won't have to use as much paper clay later on.
Then it came time for the paper clay... To afix the paper clay to the exterior walls you need to put a thin layer of white tacky glue. I prefer Aleen's Tacky glue. I found that it was easier to put the glue onto the exterior of the wall before rolling out the paper clay. The paper clay I was using seemed to dry out pretty quickly (within a matter of minutes it was getting a bit crumbly and dry on the surface). I would then roll out the paper clay to be quite thin (1/8 to 1/4 inch in thickness) and make it larger then the area I was covering. Make sure to not have the paper clay to thick. Your walls can warp if the clay is too thick because it does contain moisture and you are only applying to one side of the wall. The first wall that I covered on my house was a bit thick and the top portion of the wall bowed slightly. Using an X-Acto knife I would carefully cut off the excess clay and cut out the windows and doors. I repeated the same for all the walls. I used a needle tool to make lines for the bricks in the chimneys and to create the effect of small cracks in the walls. I rolled out a thin piece and cut out bricks to go around the door. I glued them onto the exterior using Aleen's Tacky glue. I now have to wait till the exterior is dry before I paint (dry brush) the exterior.
My Mom gave me a 1/4 inch scale fireplace kit the she designed. (She's so creative!) I figured why not make it, my miniature making was going pretty good that day. I turned out quite cute. I even used a twig from the cedar tree outside my house to make mini logs!